기록하는 습관을 기르고 더 효율적인 학습을 위해
코드로 배우는 스프링 웹 프로젝트 책을 읽고 웹사이트에 적용하며 기록한 내용입니다.
Intellij와 Gradle을 사용한 Spring MVC 환경 설정
개발환경 및 도구
Java 8
Intellij
Tomcat 8
Gradle
Mac os Majave 10.14.4
MySQL(추후 적용)
1. 프로젝트 생성
1-1. 프로젝트 생성하기
Gradle 프로젝트 선택 -> Java, Web 체크
GroupId, ArtifactId 지정
Group modules : using explicit module groups 체크 선택 / Use default gradle wrapper 체크 선택
프로젝트 이름 지정 및 완료
이렇게 프로젝트를 만들면 스프링 프레임워크에 대한 지정이 없는 상태이며 이를 추가하는 방법은 프로젝트 우 클릭 후 add Framework Support 에서 추가하는 방법과 사용자가 직접 원하는 버전으로 Gradle.build를 통해 설정할 수 있습니다.
앞에 설명한 방법은 4.3.x 버전이기때문에 저는 5.0.7버전을 사용하기 위해 직접 설정하는 방식으로 진행하였습니다.
1-2. build.gradle 설정
Maven Repository 사이트에서 builde.gradle 파일의 dependencies영역에 사용할 Spring 버전의 내용을 추가합니다.
dependencies {
    compile group: 'org.springframework', name: 'spring-context', version: '5.0.7.RELEASE'
    compile group: 'org.springframework', name: 'spring-test', version: '5.0.7.RELEASE'
    testCompile group: 'junit', name: 'junit', version: '4.12'
}
1-3. Lombok 플러그인 추가
Preferences -> plugins-> Marketplace -> lombok 검색 후 install
Restart IDE
build.gradle 파일에 밑에 내용 추가
dependencies {
    compile group: 'org.springframework', name: 'spring-context', version: '5.0.7.RELEASE'
    compile group: 'org.springframework', name: 'spring-test', version: '5.0.7.RELEASE'
    compile group: 'org.projectlombok', name: 'lombok', version: '1.18.0' //추가
    testCompile group: 'junit', name: 'junit', version: '4.12'
}- Preferences -> Build, Execution,Deployment -> Compiler -> Annotation Processors -> Enable annotation processing 체크 선택
1-4. Log4j 추가
테스트 진행시 Tomcat을 실행하며 필요한 메세지를 기록하기 위해 사용합니다.
Log4j를 제대로 이용하기 위해 build.gradle 파일에 내용을 추가하고
properties 파일도 프로젝트 내에 resources 폴더에 추가하여 내용을 입력합니다.
- build.gradle 파일에 밑에 내용 추가
dependencies {
    compile group: 'org.springframework', name: 'spring-context', version: '5.0.7.RELEASE'
    compile group: 'org.springframework', name: 'spring-test', version: '5.0.7.RELEASE'
    compile group: 'org.projectlombok', name: 'lombok', version: '1.18.0'
    compile group: 'log4j', name: 'log4j', version: '1.2.17' //추가
    testCompile group: 'junit', name: 'junit', version: '4.12'
}- 프로젝트 src -> main -> resources 폴더 내에 log4j.properties 파일을 생성 후 다음 내용을 추가합니다.
log4j.properties
log4j.rootLogger=INFO, stdout

log4j.appender.stdout=org.apache.log4j.ConsoleAppender
log4j.appender.stdout.Target=System.out
log4j.appender.stdout.layout=org.apache.log4j.PatternLayout
log4j.appender.stdout.layout.ConversionPattern= %-5p %c{1}:%L - %m%n
1-5. Tomcat 설정

IntelliJ 왼쪽 상단에 다음과 같은 ADD CONFIGURATION 을 눌러 Tomcat의 프로젝트를 추가합니다.
왼쪽 상단 + 를 눌러 항목중 맨 밑에 Tomcat Server -> Local 을 선택합니다.
Application Server -> Configure 서버의 디렉토리를 설정합니다.
사용할 URL, HTTP port 를 지정합니다.
상단 Deployment 탭에 +를 눌러 작성중인 프로젝트 war를 추가합니다.
1-6. 스프링 MVC 추가 및 xml 파일 생성
- build.gradle 파일에 spring-webmvc 내용을 추가합니다.]
dependencies {
    compile group: 'org.springframework', name: 'spring-context', version: '5.0.7.RELEASE'
    compile group: 'org.springframework', name: 'spring-test', version: '5.0.7.RELEASE'
    compile group: 'org.projectlombok', name: 'lombok', version: '1.18.0'
    compile group: 'log4j', name: 'log4j', version: '1.2.17'
    compile group: 'org.springframework', name: 'spring-webmvc', version: '5.0.7.RELEASE'
    testCompile group: 'junit', name: 'junit', version: '4.12'
}
프로젝트내 webapp 폴더 아래 WEB-INF, spring, appServlet 폴더를 생성합니다.
- spring폴더엔 root-context.xml 파일을 생성하고 appServlet 폴더엔 servlet-context.xml 파일을 생성합니다.
File -> New -> XML Configuration File -> Spring Config 로 xml 생성
File - > Project Structure -> root-context.xml, servlet-context.xml 파일 확인
servlet-context.xml 에 밑에 내용을 추가합니다.
<annotation:annotation-driven/>
    <bean class="org.springframework.web.servlet.view.InternalResourceViewResolver">
        <property name="prefix" value="/WEB-INF/views/" />
        <property name="suffix" value=".jsp" />
    </bean>
<context:component-scan base-package="com.easyh.website"/> //java package 설정
1-7. web.xml 생성
File - > Project Structure -> Facts -> Web -> Type 에서 + 로 web.xml 추가
.idea -> modules -> WEB-INF -> web-xml 내용 추가
<context-param>
<param-name>contextConfigLocation</param-name>
<param-value>/WEB-INF/spring/root-context.xml</param-value>
</context-param>
<listener>
<listener-class>
org.springframework.web.context.ContextLoaderListener
</listener-class>
</listener>
<servlet>
<servlet-name>appServlet</servlet-name>
<servlet-class>org.springframework.web.servlet.DispatcherServlet</servlet-class>
<init-param>
<param-name>contextConfigLocation</param-name>
<param-value>/WEB-INF/spring/appServlet/servlet-context.xml</param-value>
</init-param>
</servlet>
<servlet-mapping>
<servlet-name>appServlet</servlet-name>
<url-pattern>/</url-pattern>
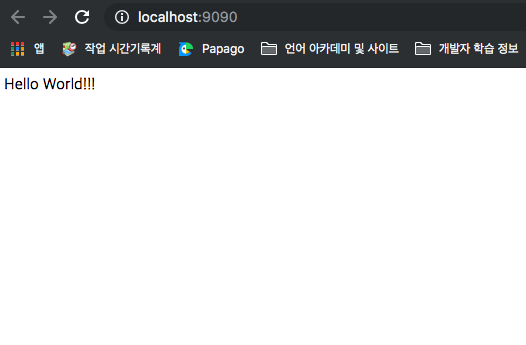
</servlet-mapping>실행결과
참고
'Spring' 카테고리의 다른 글
| Spring @Annotation 종류와 이해 (0) | 2019.05.17 |
|---|---|
| 스프링 MVC 기본구조 (0) | 2019.05.01 |
| mybatis와 스프링 연동 예제 (0) | 2019.04.30 |
| Spring 의 특징과 의존성 (0) | 2019.04.25 |
